Wiring a 3-way switch can seem intimidating, especially for beginners, but with the right guidance, it can be a straightforward and rewarding project. Whether you're upgrading your home's lighting system or tackling a DIY electrical project, understanding how to wire a 3-way switch is an essential skill. This guide will walk you through the entire process, from understanding the basics to completing the installation safely. By the end of this article, you'll have the knowledge and confidence to handle this task like a professional.
For many homeowners, electrical work can feel overwhelming due to its complexity and potential risks. However, a 3-way switch is one of the most common electrical components used in homes, allowing you to control a single light fixture from two different locations. This functionality is particularly useful in hallways, staircases, and large rooms. By learning how to wire a 3-way switch, you not only save money on hiring an electrician but also gain a valuable skill that enhances your home improvement capabilities.
Before diving into the step-by-step instructions, it's important to note that electrical work should always be approached with caution. If you're unsure about any part of the process, consult a licensed electrician. Safety is paramount, and understanding the principles behind a 3-way switch will help you avoid costly mistakes and ensure a successful installation. Let’s explore everything you need to know about wiring a 3-way switch.
Read also:Mms Videos A Comprehensive Guide To Understanding Creating And Sharing Multimedia Messaging Content
Table of Contents
- What is a 3-Way Switch?
- Tools and Materials Needed
- How a 3-Way Switch Works
- Step-by-Step Guide to Wiring a 3-Way Switch
- Common Mistakes to Avoid
- Safety Tips for Electrical Work
- Troubleshooting Common Issues
- Benefits of Installing a 3-Way Switch
- Frequently Asked Questions
- Conclusion
What is a 3-Way Switch?
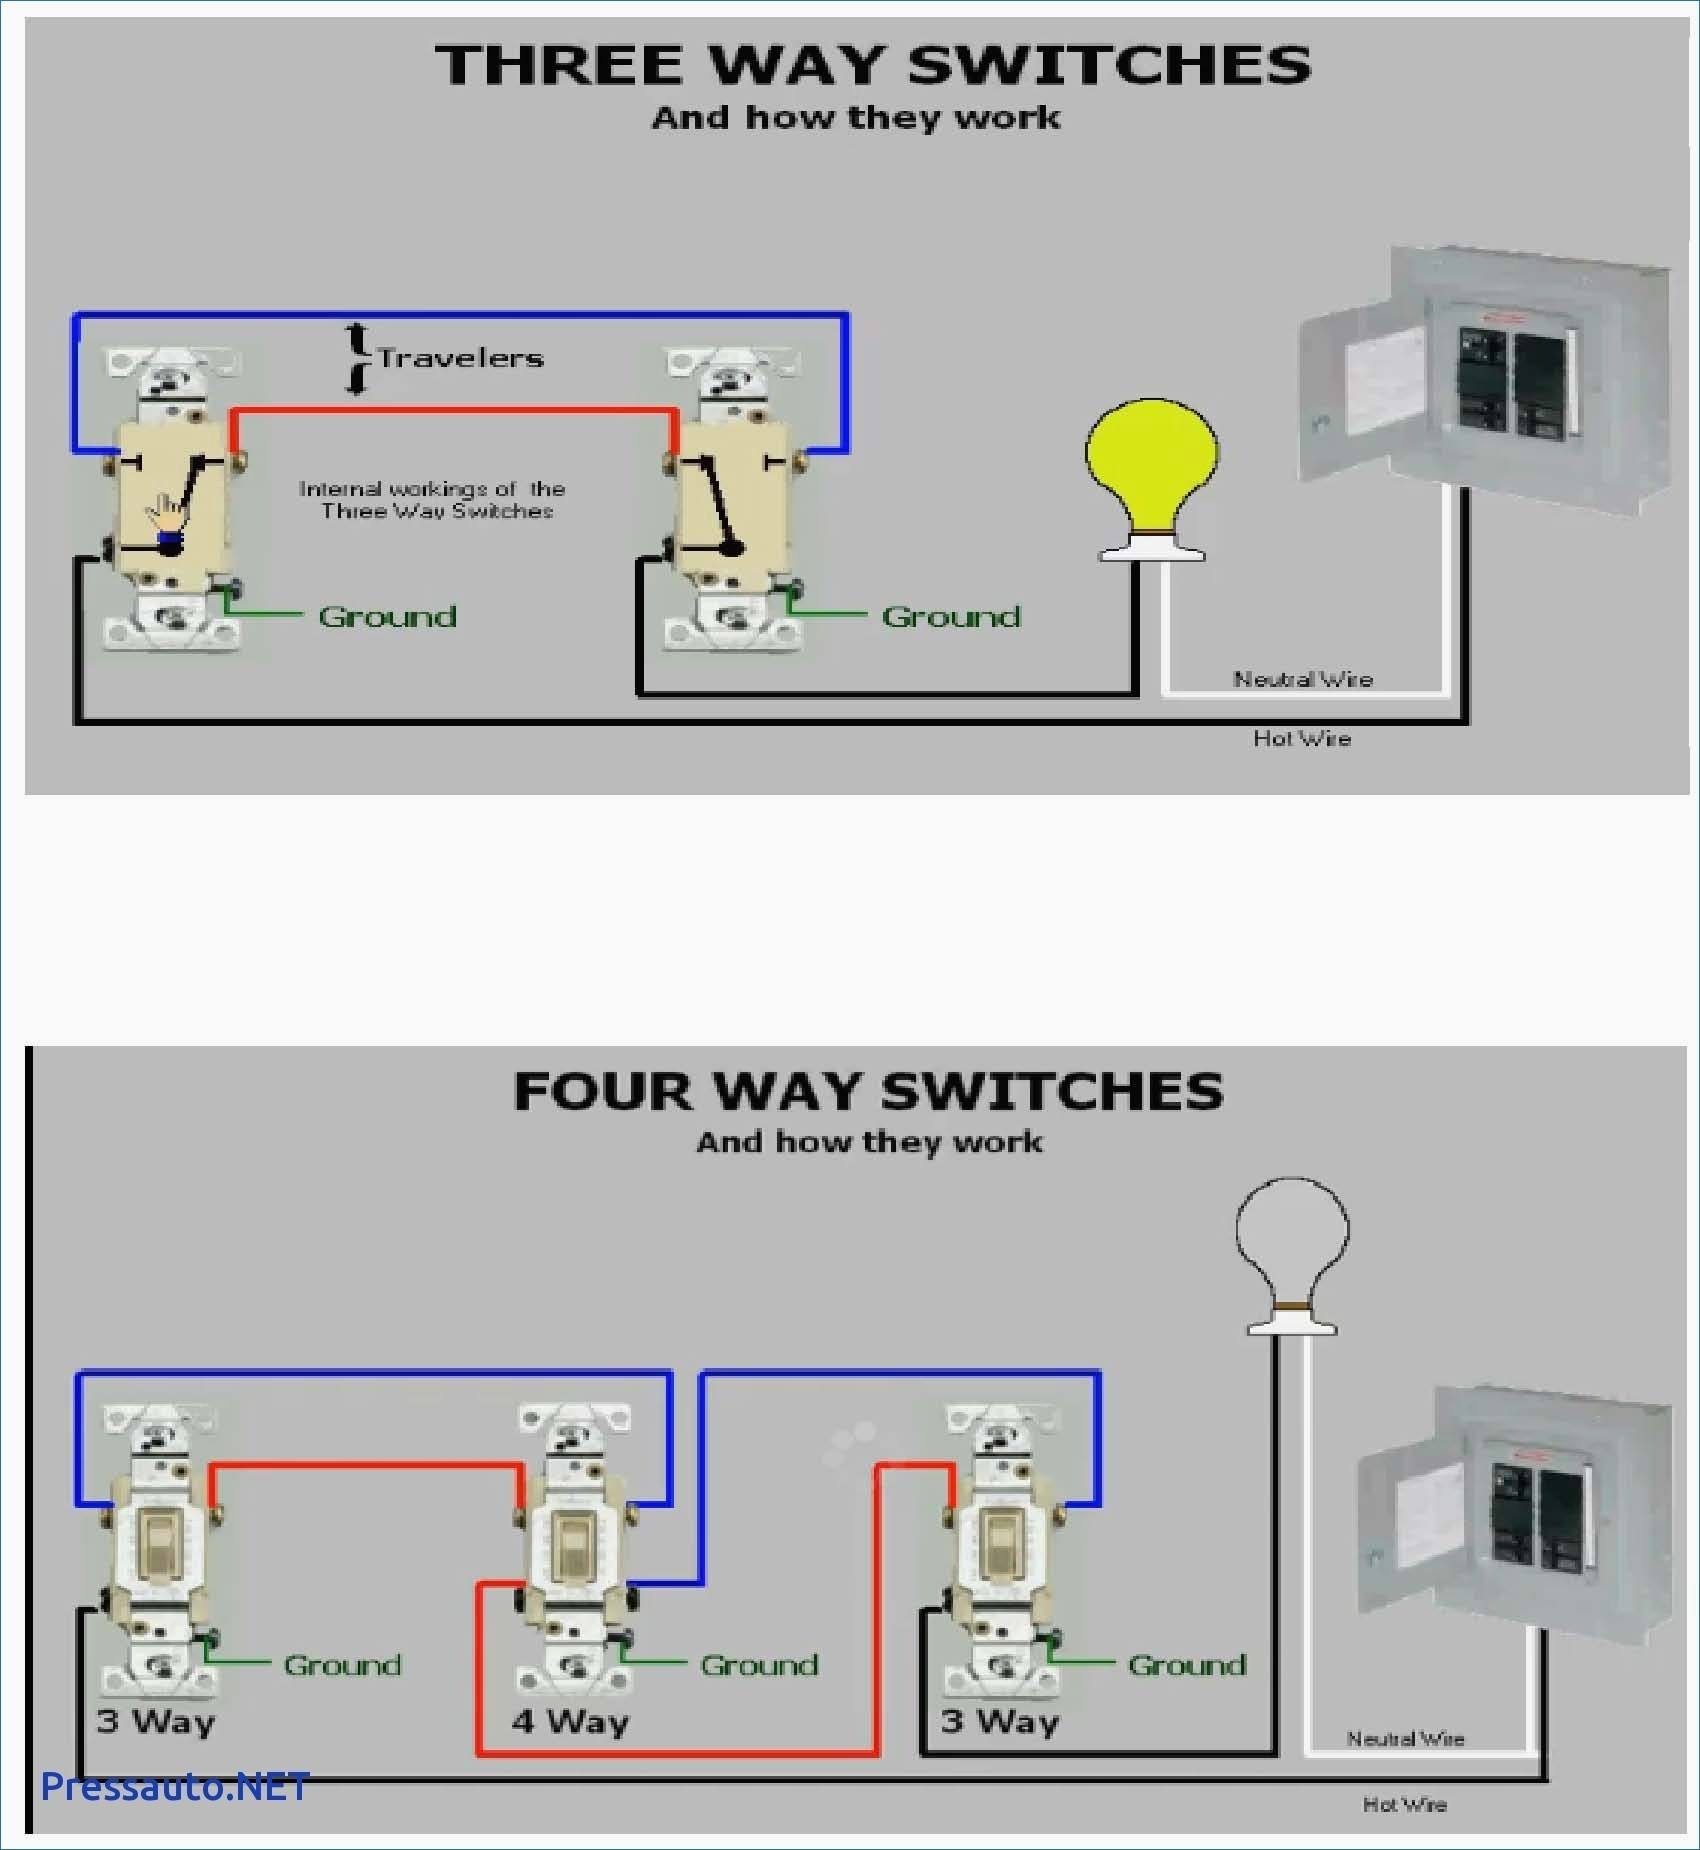
A 3-way switch is a type of electrical switch that allows you to control a single light fixture from two different locations. Unlike a standard single-pole switch, which only has two terminals, a 3-way switch has three terminals, plus a ground terminal. This design enables the switch to alternate the flow of electricity between two pathways, allowing for dual control of the light.
Key Components of a 3-Way Switch
- Terminals: A 3-way switch has three screw terminals (two traveler terminals and one common terminal) and a ground terminal.
- Traveler Wires: These wires connect the two switches and carry the electrical current between them.
- Common Terminal: This terminal is connected to the power source or the light fixture, depending on the switch's position in the circuit.
Understanding these components is crucial for wiring a 3-way switch correctly. Without this knowledge, it's easy to misconnect wires, which can lead to malfunctioning lights or even electrical hazards.
Tools and Materials Needed
Before starting the installation, gather the necessary tools and materials. Having everything ready will make the process smoother and more efficient.
Tools
- Screwdriver: Both flathead and Phillips screwdrivers are essential for securing wires and mounting switches.
- Wire Strippers: Used to remove insulation from electrical wires.
- Voltage Tester: Ensures the power is off before working on the circuit.
- Needle-Nose Pliers: Helpful for bending wires and making precise connections.
Materials
- 3-Way Switches: You'll need two switches for a complete setup.
- Electrical Wires: Typically 14/3 or 12/3 cables, depending on your circuit's amperage.
- Wire Nuts: Used to secure wire connections.
Using high-quality tools and materials ensures a safe and durable installation. Avoid cutting corners, as electrical work requires precision and reliability.
How a 3-Way Switch Works
A 3-way switch operates by alternating the flow of electricity between two pathways. This is achieved through the use of traveler wires, which connect the two switches. When one switch is flipped, it changes the pathway of the electrical current, turning the light on or off.
Understanding the Circuit
The circuit for a 3-way switch typically involves the following components:
Read also:Astrella A Comprehensive Guide To Understanding And Utilizing This Revolutionary Technology
- Power Source: Supplies electricity to the circuit.
- First Switch: Controls the initial flow of electricity.
- Second Switch: Completes the circuit and controls the light fixture.
- Light Fixture: The device being controlled by the switches.
By understanding how these components interact, you can better troubleshoot issues and ensure a proper installation.
Step-by-Step Guide to Wiring a 3-Way Switch
Now that you understand the basics, let's walk through the process of wiring a 3-way switch. Follow these steps carefully to ensure a safe and successful installation.
Step 1: Turn Off the Power
Before working on any electrical project, turn off the power at the breaker box. Use a voltage tester to confirm that the circuit is dead.
Step 2: Identify the Wires
Locate the wires in the electrical box. Typically, you'll find:
- Black Wire: The hot wire carrying electricity from the power source.
- White Wire: The neutral wire.
- Red Wire: One of the traveler wires.
- Bare Copper Wire: The ground wire.
Step 3: Connect the Wires to the First Switch
Attach the wires to the appropriate terminals on the first switch:
- Black Wire: Connect to the common terminal.
- Red and White Wires: Connect to the traveler terminals.
- Bare Copper Wire: Connect to the ground terminal.
Step 4: Connect the Wires to the Second Switch
Repeat the process for the second switch, ensuring the traveler wires are connected to the traveler terminals and the common terminal is connected to the light fixture.
Step 5: Test the Circuit
Once all connections are secure, restore power and test the switches to ensure they function correctly.
Common Mistakes to Avoid
Even experienced DIYers can make mistakes when wiring a 3-way switch. Here are some common pitfalls to watch out for:
- Incorrect Wire Connections: Misconnecting wires can lead to malfunctioning switches or electrical hazards.
- Skipping the Voltage Test: Always confirm the power is off before working on the circuit.
- Using Damaged Wires: Ensure all wires are in good condition to prevent future issues.
Safety Tips for Electrical Work
Safety should always be your top priority when working with electricity. Follow these tips to minimize risks:
- Wear Protective Gear: Use insulated gloves and safety glasses.
- Work in a Dry Environment: Avoid working in wet or damp conditions.
- Follow Local Codes: Ensure your installation complies with local electrical codes.
Troubleshooting Common Issues
If your 3-way switch isn't working as expected, here are some troubleshooting tips:
- Check Connections: Ensure all wires are securely connected.
- Inspect for Damage: Look for frayed or damaged wires.
- Consult a Professional: If the issue persists, seek help from a licensed electrician.
Benefits of Installing a 3-Way Switch
Installing a 3-way switch offers several advantages:
- Convenience: Control lights from multiple locations.
- Energy Efficiency: Reduce energy waste by turning off lights from different areas.
- Increased Home Value: Modern lighting solutions can enhance your home's appeal.
Frequently Asked Questions
Q: Can I install a 3-way switch myself?
A: Yes, but only if you have the necessary skills and tools. If you're unsure, consult a professional.
Q: What is the difference between a 3-way and a 4-way switch?
A: A 4-way switch allows control from three or more locations, while a 3-way switch controls from two locations.
Conclusion
Wiring a 3-way switch is a valuable skill that can enhance your home's functionality and convenience. By following this guide, you can complete the installation safely and effectively. Remember to prioritize safety, use high-quality materials, and consult a professional if needed. If you found this article helpful, share it with others or leave a comment below. For more home improvement tips, explore our other articles!